Getting Started with Orange Pi PC
This tutorials aims to help you jump start working on your Orange Pi PC.
By the way, Orange Pi PC is an open-source single-board computer. It can run Android 4.4, Ubuntu, Debian, Rasberry Pi Image, as well as the banana pi Image. It uses the AllWinner H3 SoC, and has 1GB DDR3 SDRAM. I only coscost $15. But off-course in the Philippines the price might be slightly different. |
| Orange Pi PC |
So let’s dive in and make your Orange Pi PC working. Just follow this step.
Step 1 Prepare the Hardware Components
Before going any further please make sure that you have the following hardware:
- Orange Pi PC ( If you haven't purchased yet. You can purchase it here. I personally know the seller and he provides excellent after sales support.
- Power adapter 5V at least 2A rating. You can also purchase it here.
- microSD card atleast 4GB preferably class 10 but class 4 will work. The rule of thumb is that your microSD should have higher capacity than the size of your preferred OS.
- microSD card reader. You will use this in installing the OS. You can purchase it at any computer store.
- Monitor. You can use your old monitor if you have.
- HDMI cable.
- (Optional) HDMI to VGA converter. If you are using a monitor that supports VGA input only, you need to have a HDMi to VGA converter
Step 2 Prepare the Software Components.
Now that you have the hardware, let us prepare the needed software. In this tutorials, I would assume that you are using a Windows. I will create a tutorial for Linux later. Go ahead and download the following:
- SD Card Formatter. You need this to format your microSD card.
- Win32 Disk Imager. You will need this to write the OS image to your microSD card.
- Preferred OS for your Orange Pi PC. You can either download the files from Google Drive or Mega or Official Orange Pi site If you want to use your Orange Pi PC for IoT and Tinkering, I recommend the Raspbian OS. If you want to use your Orange Pi PC as a personal computer. Go for the Ubuntu Mate image, this is my personal favorite. After downloading your preferred OS, uncompress it 7-zip or winrar whatever is your preference.
- You're ready to go.
Step 3 Install the OS to the microSD card
To install the OS to the SD card follow this instructions:
- Install the SD Card Formatter into your Windows Machine.
- Install the Win32 Disk Imager into your Windows Machine.
- Insert your microSD into your Windows computer. Use an adapter or USB card reader if necessary.
- Format the microSD card using the SD Formatter.

Click the Format Button

Click OK

Click OK - Write the image of your preferred OS (in my case I use my personal favorite which is Ubuntu Vivid Mate) using the Win32 Disk Imager. Click the Folder Icon --> Navigate to the location of your preferred OS.

Click the Folder icon
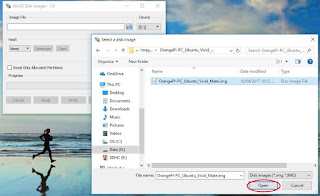
Navigate to the location of your preferred OS image.
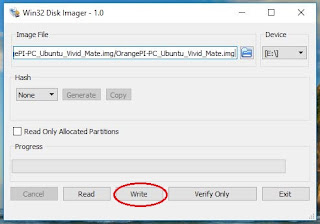
Click the Write Button

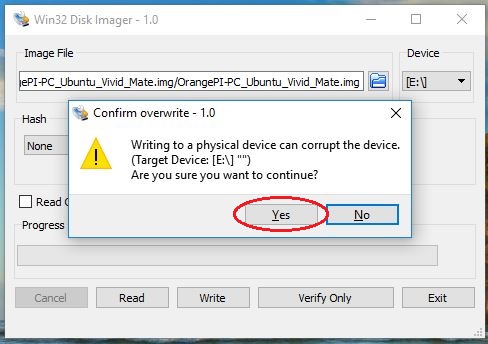
Click Yes

Wait for the Write Process to finish 
Write Successful. Proceed to the next Step. - After writing the image to the microSD card open the microSD card, Open the microSD and rename the file "script.bin" into "script.bin.backup"" and the "uImage" into "uImage.backup".

Click the BOOT drive. Note that this is the same microSD card that have 8GB capacity but the capacity have been resized. This is absolutely normal and we will fix the capacity later.

Rename the file "script.bin" into "script.bin.backup"" and the "uImage" into "uImage.backup"

After renaming this should be what it will look like. - Copy the script.bin.OPI-PC_720p60 and uImage_OP-2 from the scriptbin_kernel which you have downloaded earlier.

Copy the script.bin.OPI-PC_720p60 and uImage_OP-2 from the scriptbin_kernel which you have downloaded earlier. - Paste the copied files from scriptbin_kernel into the microSD card. Overwrite whatever files there.

This is what your microSD look like after copying the script.bin.OPI-PC_720p60 and uImage_OP-2 from the scriptbin_kernel - In the microSD, rename the script.bin.OPI-PC_720p60 into script.bin and uImage_OP-2 into uImage.

This is what the microSD should look after renaming the script.bin.OPI-PC_720p60 into script.bin and uImage_OP-2 into uImage. - You microSD card is now ready.
- Remove the microSD and insert it in your orange pi pc.


Step 4 Start your Orange Pi PC.
To start your mini PC follow the following.
- Insert the microSD card into your Orage Pi PC.
- Connect the monitor, mouse, and keyboard
- Apply power to the Orange Pi PC
- Enter the password orangepi.
- Once in the Desktop, Open a terminal.
- Enter the following sudo fs_resize. (This will restore the size of the microSD card)
- Enter your password which is orangepi.
Step 5. Enjoy
If you liked my tutorial, kindly leave a comment and if you want other tutorials please let me know.
I will also be posting tutorials on using your new Linux Computer and Setting up the GPIO of your new Orange Pi PC.
I will also be posting tutorials on using your new Linux Computer and Setting up the GPIO of your new Orange Pi PC.
Comments
Post a Comment